Welcome

Thanks for stopping by. I hope you find your visit here inspirational and helpful.

Please contact me if you have any questions.

Before you go, I'd love you to leave a comment. They are -

v the icing on my cake!

v the bling on my card!

v the "Diet" in my "Coke"!

Martha

Showing posts with label Thanksgiving. Show all posts

Friday, November 19, 2010

Day of Gratitude

It has been a while since I've done a challenge at SplitCoast Stampers. The Friday Free for All Challenge was to create a "thank you" card. Seems very appropriate for this time of year. And Day of Gratitude seemed to me the perfect choice for the stamp set.


The large floral image in the center was inked using 3 different Stampin' Write Markers, Old Olive, More Mustard, and Cajun Craze. It took me a few minutes to color the entire image but, the ink never dried. After giving it a "huff" or two, the image came out crisp and clear. The background piece was created using a leaf image from Day of Gratitude as a mask and sponging around it with More Mustard ink.

Thanks for stopping by! The Simply Amazing Starter kit promotion has 11 more days left. It is a great way to try out all the benefits of a Stampin'Up! demonstratorship through March and receive $310 worth of Stampin'Up! stamps, inks, paper, and a lot more for only $87.50. Contact me if you have any questions, I'm here to help.!

God Bless,

Recipes:
Stamps: Day of Gratitude
Ink: Old Olive, Cajun Craze, More Mustard Stampin' Write Markers
Paper: More Mustard Textured card stock, Autumn Spice Specialty paper, Whisper White card stock
Misc: Regal Designer Buttons, Linen Thread, 5/8" Old Olive Green Grosgrain ribbon, Sticky Strip, Glue Dots

Sunday, November 7, 2010

A Fun Afternoon

We had a wonderful time at the Holiday Project today, making holiday place cards. Moms' brought their daughters to help them and as you can see the girls helped. My sweet daughter, Rachel, took all the young girls and helped them create their turkey place cards using the Sweet Treat cups. You can see the project here.
Margo helped her mom stamp and watercolor the pumpkins. Margo even helped emboss the backs of them. Honestly, Margo put the whole thing together while her mom supervised. We could be looking at the next paper crafter extraordinaire or Rising Star Stampin'Up! Demonstrator!

We used the Thankful For set on the place cards. The idea being you would write the person's name who was going to be sitting there; letting them know you are thankful for them. Margo took the phrase literally and wrote who she was thankful for, mom and God. We thought her dad could sit at God's place card for the Thanksgiving dinner. I don't think He'd mind.

My Michele stopped for a quick pose with her place card. She did an amazing job. I guess it's in her genes!
After two hours of paper crafting there is nothing better than a cup of cocoa WITH marshmallows and a good friend to share it with. Maya and Ally BFFs!

It was a great afternoon! My next event is a children's only event: Santa's Workshop on Sunday, December 5th. Children and teens will have a chance to create some inexpensive hand made gifts for friends and family. For event details please visit my Stampin'Up! Events page. Contact me if you have any questions.

I hope you enjoyed our project for today! Have a great week!

God Bless,

Monday, November 1, 2010

Holiday Project


Project cased from Brenda Quintana

Setting the table is a big part of every holiday celebration and letting your family and company know how thankful you are for them with these place cards is a perfect beginning.

This fall we will be making place cards for our Holiday Project. Above are some samples.
  • There will also be a Christmas place card for children similar to the child's Thanksgiving Place card.
  • The Christmas Place card will have other options and samples will be available the day of class to choose from!
  • Each place card is embossed on the back.

Cost of the class is $15 and you will create 6 place cards of your choice. If you need more than 6 place cards, each additional card will cost $1.50. Please RSVP by this Thursday, November 4th with the number you will be making and how many adult and child place cards you need.

God Bless,

Tuesday, October 12, 2010

October Pals Hop - Thankful Thanksgiviing!


Welcome to the October Pals Hop! This month we are showcasing Thanksgiving and thankfulness projects! If you've arrived from Angela Richwine's Stampin away with Angela, I'm stop number eleven on the hop and I'm thrilled you're here. I hope you find some great projects to inspire you as we enter the Thanksgiving season. If you get lost along the way, simply click on any link in the Pals Line-up and you will be back on course!


Now, on to my Thanksgiving projects!


Thanksgiving for some reason is my favorite holiday. I love the images and colors that are associated with this holiday. I love the story and history behind the holiday. And I love that it is as simple as being thankful! Setting the table is a big part of this holiday and letting your family and company know how thankful you are for them with these place cards is a perfect beginning.

The place cards are created on a 5"x5" piece of card stock scored at 2 1/2". The Very Vanilla piece is stamped with the sentiment from the Thankful For stamp set. The pumpkins are from the Autumn Harvest stamp set and were stamped on Watercolor paper using Black Stazon ink. I colored them using Blender Pens and Stampin' Write Markers. To make them a bit more 3-D, I cut a sliver of Garden Green card stock and wrapped it around one of the tools from the Distressing Essentials Kit. It looks just like pumpkin vines!


When I showed this project to my husband, he could not figure out what it was. Not good! Well I've added a hint in the picture to help. 3-D projects are always a favorite of mine. This ACORN container was created using the Pillow Box Die and the Big Shot. You can find the instructions I used here.

I wanted a lot of texture so the ACORN nut was made using Chocolate Chip Textured Card stock and the ACORN cap was made using 1" strips of Sahara Sand card stock embossed with the Square Lattice Embossing folder. The oak leaves were cut out with the Leaves #2 Die using More Mustard and Cajun Craze card stock and then embossed using the Vintage Wallpaper Embossing Folder.

The sentiment in the picture is from the Thankful For stamp set.


This cute container can hold a special treat as a gift or even as a center piece!


Thanks for stopping by. I'd love to hear what you thought of today's projects, including my ACORN so leave a comment!

Now it's time to head over to Kris Kilcoyne's, Kweenbee site for some more great projects!


God Bless,
Projects created using Stampin'Up! products
Recipe:
Place cards:
Stamps: Thankful For, Autumn Harvest
Ink: Black Stazon, Cajun Craze Classic ink, Pumpkin Pie, More Mustard, and Daffodil Delight Stampin' Write Markers
Paper: Rich Regal card stock, Very Vanilla card stock, Watercolor Paper
Misc: Distress Essentials Kit, Stamp-a-ma-jig, Stampin' Dimensionals

Acorn:
Stamps: Thankful For
Ink: Cajun Craze, Sahara Sand and Chocolate Chip Classic ink
Paper: Chocolate Chip Textured Card stock, Sahara Sand, Cajun Craze, More Mustard, Very Vanilla card stock
Misc: Big Shot, Pillow Box die, Leaves #2 Die, Square Lattice Embossing Folder, Vintage Wallpaper Embossing Folder, Sponge Dauber

Thursday, September 23, 2010

Pals Featured Artist & Day of Gratitude

Today's challenge at Pals Paper Arts is a sketch challenge. Check out the sketch and all the great creations by the design team here and play along!

I chose Stampin'Up!s Day of Gratitude stamp set available in the new Holiday Mini Catalog for the challenge. I also choose to use a lot of different textures in creating this card.

The leaves were stamped onto Stampin'Up!s beautiful Textured Card Stock and then cut out. The Top Note Die was used to give me a frame which I dry embossed using the Square Lattice Embossing Folder. I also snuck in a small piece of Early Espresso underneath the frame which was embossed using the Vintage Wallpaper Embossing Folder.

I needed an embellishment to tie a few of the leaves together so, I made my own. This you could do with most any image. I stamped the acorn onto Textured Card stock, cut it out, and applied Crystal Effects on top. When It dried I had a 3-D acorn!

I hope you enjoyed today's PPA Challenge. See the recipe below for a complete list of supplies used. Feel free to contact me with any questions regarding this project. Thanks for stopping by.

God Bless,


All Stampin'Up! Products
Recipe:
Stamps: ( WM-Wood Mount, CM-Clear Mount) Day of Gratitude CM
Ink: Early Espresso Classic Ink
Paper: Early Espresso Plain and Textured, Kiwi Kiss, Cherry Cobbler, More Mustard, Bravo Burgundy Textured Card Stock
Misc: Big Shot, Square Lattice Embossing Folder, Vintage Wallpaper Embossing Folder, Top Note Die, 1 1 /4" Striped Early Espresso Ribbon, Crystal Effects, Linen Thread, Glue Dots, Stampin' Dimensionals, SNAIL, Paper Snips

Thursday, November 19, 2009

The Big Shot Pilgrims Have Landed!!

Oh My Goodness ~ These are too stinkin' cute! I know, I know, she looks like a he and not very feminine but, I love her!! The inspiration for the Pilgrims came from Tammy over at Dream, Create, and Share. You will find the tutorial for the male pilgrim there. The lunch bag project came from Adriana over at Escape 2 Stamp. The project details are in my Wrapping 101 PDF.


This is a Big Shot Top Note and Stampin'Up! punch project! These Pilgrim crafts would be great as decorations, or projects for the craft-abled youngsters.

For the female, (maybe I should name her) the only changes from the male Pilgrim were the hat, hair, and collar.
  • The hat is a 4 1/4" square piece of Whisper White with a 4 5/8" diameter circle cut out of the bottom of the square. I cut the top of the hat down about 3/4"
  • The hair is 1/2 of a Chocolate Chip and Whisper White top note cut sideways and then cut in half length ways. The Chocolate Chip is layered over the Whisper White showing just a bit of white around her hair. There is also a 3/4"x 4" strip of chocolate chip under the hat which I cut to make bangs.
  • The collar is 3/4"x 4 1/4" strip of Whisper White with a triangle cut out of the middle (I used the 1 3/8" square punch) layered over a 1"x 4 1/2" strip of black. It also has a triangle cut out of the middle.
Each pilgrim is layered on a piece of 5 7/8"x 4 7/8" piece of Autumn Traditions Designer Series paper over a 6"x5" piece of Basic Black card stock. This was then mounted on a paper lunch bag that was cut down to 7 1/2" and scalloped using the Scallop Edge punch.

I bet Indians would be cute too!!

Enjoy, and contact me if you have any questions or need supplies to create these cute Pilgrims!

God Bless,


Recipe:
Ink: Creamy Caramel, Crushed Curry, Black Stampin' Write marker, Uni-ball Signo White Gel Pen
Paper: Basic Black, Whisper White, Chocolate Chip, Blush Blossom, Crushed Curry, Always Artichoke, Brocade Blue card stock, Autumn Series Designer Series paper
Misc: Curly Label punch, Scallop Edge punch, 1" Circle punch, 3/4" Circle punch, Round Tab punch, 1/2" Circle punch, 1 3/8" Square punch, Top Note Die, Big Shot, Slot punch, Sponge Daubers, SNAIL, Sticky Strip

Wednesday, November 18, 2009

Stampin'Up! Sweet Centers for the Holidays

The children will love sitting down to Thanksgiving dinner with these cute turkeys to greet them.


The Thanksgiving place card was created using Stampin'Up! Sweet Centers stamp set and the Sweet Treat cups. I attached a slider card so the children won't have to tear apart the turkey to get to the treats. These place cards can be used year after year.

The Thanksgiving napkin rings are simplified versions of the turkey from the "Turkey Place card Tutorial" I did and attached to a 1"x 6" piece of card stock.

Place card instructions:
  • 5"x5" piece of Old Olive card stock, scored at 2 1/2". Textured card stock is the prettiest!
  • 2 1/4"x 4 3/4" piece of Very Vanilla card stock. Corners were shaped using the Ticket Corner punch. Happy Thanksgiving was stamped in the right hand corner using Old Olive ink. This stamp is from the retired set Holiday & Wishes. Attach Very vanilla card stock to the Old Olive card stock. Secure the lefts side up through the center but only secure the right side corners because you will be punching a hole out of the right side. (I hope this makes sense)
  • Feathers were stamped using the petal stamp from Sweet Centers stamp set and the Stamp-a-ma-jig. Trim around petals. Using the 1 3/4" Circle Punch, punch a hole in the center and remove the bottom petals/feathers.
  • Cut a 2 3/4", using the Circle Scissor plus, out of Chocolate Chip card stock and punch a 1 3/4" circle out of the center.
  • Place 4 glue dots around the front of the Sweet Treat cup and attach the feathers on top of the glue dots. Place a thin layer of Tombow glue to the back of the Chocolate chip ring and attach it over the feathers.
  • Attach eyes and a small triangle beak to the front of the Sweet Treat cup.
  • Cut a 2"x 2 3/4" strip of More Mustard card stock. This is your slider strip. You can stamp another image on the top or possibly Happy Thanksgiving again on the top. Round the top edges with the Corner Rounder punch.
  • With your 1 3/4" Circle punch, punch a hole in the right side of the place card. You will have to go through 2 pieces of card stock unless you cut the Very Vanilla down. Be careful to not cut it too short, if you do.
  • Lay the More Mustard strip over the hole and place a couple of glue dots along each side but not touching the strip. This will allow you to attach the Sweet Treat cup to the place card and give the slider strip a guide. Don't place a glue dot on the bottom of the place card, let the slider card slip down so it is even with the bottom of the place card.
  • With Sweet Treat cup attached to place card, fill with treats. Insert slider card.
  • If you find that adding the treats weighs the place card down too much, causing it to flatten out, place a short strip of card stock or single side tape to the inside of the place card which will keep it standing better.
If you would like to create your own Thanksgiving place cards and napkin rings, see the recipe below. If you need supplies contact me or place your order on-line at my Stampin'Up! store. As always, contact me if you have any questions!

Have a wonderful Thanksgiving!


God Bless,

Recipe:
Stamps: Sweet Centers , Teeny Tiny Wishes, Holidays & Wishes
Ink: Ruby Red, Really Rust, Crushed Curry, Old Olive, Chocolate Chip
Paper: Old Olive, Very Vanilla, Whisper White, More mustard, Chocolate Chip card stock
Misc: Ticket Corner punch, Corner Rounder punch, Stamp-a-ma-jug, 1 3/4" Circle punch, Sweet Treat cups, Glue dots, Tombow, SNAIL, eyes, treats

Tuesday, November 17, 2009

Stampin'Up! Your Thanksgiving Table


Decorate your Thanksgiving table this year with homemade place cards and napkin rings.


The place cards use the tutorial on the left. I used textured card stock for the actual place card this time and love the added class it gave them.

The napkin rings are just a piece of Autumn Traditions paper decorated with leaves and buttons of coordinating paper, linen thread, and the Holiday Best Hostess set. I kept my napkin rings simple but you could layer multiple colors together to make a formal design!

If you would like to create your own table place settings see the recipe below. Tomorrow we will do the same thing for the kids! Hope you can stop by!

God Bless,

Recipe:
Stamps: Holiday Best hostess set
Ink: Ruby Red, Always Artichoke, Soft Suede, More Mustard
Paper: Autumn Traditions Designer Series paper, Whisper White, The Write Stuff Designer Series paper, card stock scraps for buttons
Misc: Leaves #2 Die, Sizzlit Buttons #5 die, Big Shot, Linen Thread, Stampin' Dimensionals

Monday, October 26, 2009

Thankful Garland Project and Class


I've received a number of questions regarding the Thankful Garland. Here are close ups of the garland and the back.


Each panel is 5 1/4"x 9 1/2" scored along the 9 1/2" side at 4 1/2" and 9". The extra 1/2" flap is what I used to attach each panel together; cutting off the 1/2" section on the last panel. I used Textured card stock and Sticky Strip for the garland which made a very sturdy display.

If you live in the Melbourne, Florida area we will be making the Thankful Garland this weekend. There are two spots still available in each class, Friday, October 30 at 7:30pm and Sunday, November 1, at 1:00pm. Class cost is $15 and includes all materials except photos. Garland colors may vary but will coordinate with the Autumn Traditions Designer Series paper. These colors include Always Artichoke, Ruby Red, More Mustard, Soft Suede, Elegant Eggplant, and Chocolate Chip. If you are unable to attend but would like to make the garland you can order a kit by mail. ~ The cost is $15 plus $1.50 shipping and does not include adhesive.
To sign up for the class or place an order contact me at SeasonsOfStamping@cfl.rr.com.

God Bless,

Thursday, October 22, 2009

PPA ~ Thankful Garland

I am so excited about this week's Pal's Paper Arts Challenge. First, I'm the "Featured Artist" this week and second I got to create this garland I've been itching to make. This is the project for my October class which had to be rescheduled for early November.


I know I will use this garland for many years to come to decorate my home. The end pieces highlight my children; girls on the left and boys on the right. And each piece in between spells out THANKFUL. I used Autumn Traditions Designer Series paper in designing each panel and pulled in coordinating colors to accent each one. The colors I used were Ruby Red, More Mustard, Always Artichoke, Elegant Eggplant, and Soft Suede.

Each panel is 4 1/2" X 5 1/4" and folds up into a neat little book when I'm ready to put it away.

As always this project has a lot of possibilities. I think my favorite part of it is personalizing it with family pictures. It definitely is a keepsake to treasure.

Please see the recipe below if you would like to create your own Thankful garland. If you would like to attend the class make sure you are on my Newsletter mailing list. And, if you have any questions, contact me!


God Bless,

Reciep:
Paper: Autumn Traditions DSP, Almost Artichoke, More Mustard, Ruby Red, Elegant Eggplant, and Soft Suede Textured Card Stock
Misc: Biz Z Die Serif Essentials Alphabet (#113464), Jumob Eyelets (#108432), Top Note Die (#113463), 1/2" Soft Suede Polka-Dot Grosgrain Ribbon (#115612), Buttons #5 Sizzlits Die (#113440), Photo Corners (#109042), 1/4" Elegant Eggplant Grosgrain Ribbon (#109039), Corner Rounder punch (#109047), Stampin' Dimensionals (#104430), SNAIL (#104332), Paper Piercing Tool (#116631), Eyelet Border (#113692), Retired Chocolate Chip ribbon

Thursday, October 1, 2009

Wrapping 101 #18 and PPA #10 ~ Blessing Mix

Today's Wrapping 101 is trail mix called "Blessing Mix". Each piece represents a part of our country's founding story. I saved this project for today because the Pals Paper Arts challenge was to create something to show "thankfulness".


Even though times are tough in our country right now, I'm very thankful for the foundation that was laid so very long ago. Our story is truly amazing and Providential, I pray I never forget it.

The Fancy Favor die and the Leaves #2 die paired with Autumn Traditions and the Write Stuff DSP were a perfect mix. I think I just found my Thanksgiving table decorations!

Join Me tomorrow for more Wrapping 101!

God Bless,


Wednesday, September 30, 2009

Turkey Placecard Instructions


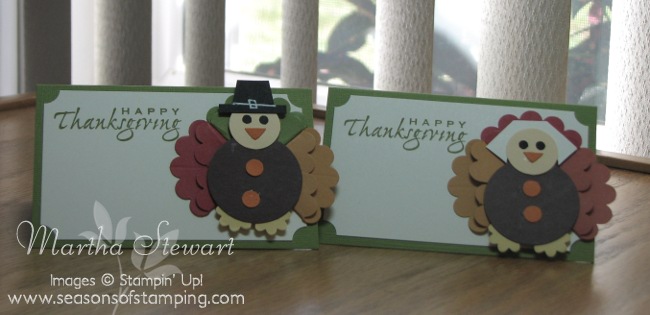
Place cards from 2008
Someone had asked for the instructions to the turkey place cards I created last November. The idea for the turkey is from the October 2008 Stampin' Success magazine. This magazine is one of the perks you receive as a Stampin'Up! demonstrator.
From top to bottom:
  1. 2 ~ Scallop Circle punches (I used DSP this year because it is thinner and easier to work with)
  2. 1 ~ 1 3/8" Circle punch in Chocolate Chip for the body(The picture shows the 1 3/4" circle but I like the smaller circle better)
  3. 2 ~ So Saffron Boho Blossom punches for the feet
  4. 1 ~ So Saffron 3/4" Circle punch for the head
  5. 1 ~ Black or White square for the hat (male turkey got a black hat and the female turkey got a white bonnet). Hats are cut out with paper snips.
  6. 1 ~ orange tip from the 5 Petal punch for the beak
  7. 2 ~ orange 1/4" circle punches for buttons (I'm not sure why turkeys have buttons but these did and it looks good)
  8. 2 ~ Black Double Circle punches for eyes (I used a Black Stampin' Write marker to make my eyes)
Cut 5 scallops off each Scallop Circle punch.
Fold the Scallop Circle in half and then unfold to leave a line down the middle. Fold each side to the middle line.


The place card is a 4 1/2" x 5" piece of Old Olive cardstock scored at 2 1/2" along the long side.
A 4 1/4" x 2 1/4" piece of Very Vanilla card stock is stamped with Happy Thanksgiving and attached to the place card.

Attach your turkey feathers to the place card and then attach the other body parts to the feathers. Voila, you have Tom and Teresa Turkey!!

This was a definite punch project. If you don't have all these punches, try creating it with what you have. For example, a Scallop Square punch might work just as well as the Scallop Circle punch with a little adjustment.

Contact me if you have any questions.

God Bless,


Thursday, September 24, 2009

Stampin'Up!s Autumn Harvest for PPA #9

The Pals Paper Arts Challenge today was an inspiration challenge using the picture below. I love the different textures in this Pottery Barn picture and I really love all the Earth Element colors I see in it. I chose the colors as my inspiration element and created this card for my up-coming Holiday Open House using the Autumn Harvest stamp set.


The images were stamped on Natural White card stock using Stazon Black ink. I didn't worry about overlapping the pumpkins. Instead I stamped a second large pumpkin, cut it out, and popped it on top. It covers up all the overlapping.

Using the Aqua Painter and drops of Old Olive and Pumpkin Pie ink, I water colored the images. I was surprised how well the Natural White card stock worked; it took a lot of water without rippling the paper.

If you are attending my Open House this Sunday, you will see this card again as we try our hand at water coloring. This is one of the cards we will be making. If you live around the Melbourne area and would like to attend the Holiday Open House, contact me, there are still two spots available.
To recreate this card see the recipe below and check back tomorrow for more Wrapping 101!


God Bless,

Recipe:
Stamps: Autumn Harvest (#110372), Holiday Best (#115364)
Ink: Pumpkin Pie ink refill (#105229), Old Olive ink refill (#100531), Stazon Black (#101406)
Paper: Old Olive (#100702), Pumpkin Pie (#105117), Naturals White (#102316)
Misc: Hemp Twine (#100982), 3/16" Corner Rounder (#109047), Aqua Painter (#103954), Paper Snips (#103579), Stampin' Dimensionals (#104430), Dotto (#103305)